Tuesday, October 25, 2011

Blue Semi-Sheer

I realized that I never did a post solely for my blue semi-sheer dress.  So without further ado, here it is!


In the design process, the dress went through many changes! I finally settled on an open coat sleeve and a plan gathered front bodice with waistband. 

Before any trim


I used this dress as inspiration for the trimming.  The trim is just a small frill down the center front around the neck and then on the sleeve edges.  The neck started out as a jewel neck and then ended up being a V-neck that is basted back to form the V.


For the first event, I wore a regular rounded collar with it, but I didn't like the way it looked (I don't think it was long enough), so for the next event I made a white lawn frill to go inside the neckline.  I ended up just using the selvedge edge and sewing it to a muslin bias band.  


The fabric is super light and floaty! Truly dreamy! Sadly, it is now late fall and I won't have another opportunity to wear it until at least March (more likely May-July), but, I can't wait to wear this again!

Monday, October 17, 2011

Chemise and A Big Project...


 I finished my chemise that I started back when the power went out for 5 1/2 days! I used 100% cotton muslin and it's sewn 100% by hand.  I used Kay Gnagey's Simplicity pattern 2890.  It went together really well and I'm very pleased with how it came out.


I am currently working on what's-turning-into-a-big project: an article/pamphlet/book for new lady reenactors.  I will be posting it on here as a free resource that you all will be able to print and hand out or read online.  It's turning out to be a lengthy piece of literature, so hang in there, I think it will be worth it ;)


Tuesday, October 4, 2011

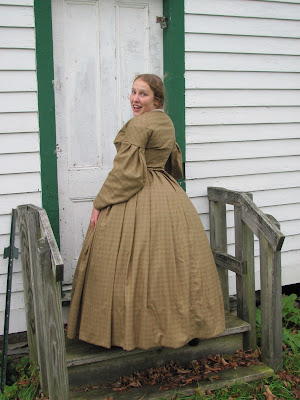
Brown Plaid Wool Dress


Well! It is finally finished (almost ;)--still have to baste the bodice and skirt together and add some boning to the back point)!! I wore it to an event this past weekend (boy was I glad I had it done, because it was COLDDDD!! I was very thankful for my paletote, too).


I bought the wool when it was on sale back when Fabric.com had their big fabric sale.  I found out I was pregnant right after I got the fabric, so it was set aside to marinate until I resumed "normal" measurements. ;)


 I completed the skirt probably a year ago, and didn't touch it for a long time because of more relevant projects.  Let's face it, a wool dress (even if it is tropical weight) compared to a nice semi-sheer lawn will lose when it's 90 degrees and sunny out ;)  However, the beginning of September rolled around (and along with it, cooler and rainy weather) and I got thinking that I would need to get going on my wool bodice if I was going to have it done by our next event (October 1 & 2).  So I started researching and planning on what I wanted to do.  I searched off and on for 3 weeks for inspiration by looking at CDV's, pictures of original dresses and fashion plates from the 1860s.  I just could NOT find anything that jumped out at me.  Good sleeves are very important to me and I really just wanted a sleeve that popped out at me.  I also wanted a sleeve cap, since I'd never done one before and I like the way they look. 

Inspiration Image

The bodice is lined in premium bleached muslin and the sleeves and caps are lined in brown Egyptian cotton.  I didn't have enough of either to do both.


 In my original planning, I was thinking of doing a yoked dress, but during the process of looking for a sleeve and mulling it all over, I decided that I wanted to go with a pointed bodice.  I searched for pointed bodice threads on The Sewing Academy and as I was reading through, I came to a picture that another member had posted.   Ironically, it was from a site that I had already been poring over! I don't know how I missed it, but I did! Because I'm always second-guessing myself, I put it to a vote on FB whether I should do one point or two--and it got unanimously voted for two (I was leaning towards two, anyway).  I also decided to do a back point.


I need to bone the back point, apparently ;)

 
 I really am so pleased with how it came out! I probably will evenutally trim it like the inspiration image, but I have to ruminate on what color to trim it with ;) 

Now a good, well deserved rest and then on to my Winter Sewing Projects (list forthcoming).


Wednesday, September 14, 2011

Weather Change

Well, apparently, with Fall-ish weather my desire to blog comes back :) I, of course, have a lot that I can blog about since we've done a few events since my last post plus all of my little sewing projects! :).

We did an event at the end of July.  It was the first time that we'd done this event and it turned out to be a nice little event.  The grounds have a lot of potential and the organizers seem to be very open to suggestion and change for the better.  It's on a nice big farm with a mill and water wheel.
The Mill (with blue-belly infantry inside)
 
Buck came out again!


Elsa helped me work on my blue semi-sheer dress ;)


 I was able to wear my semi-sheer dress for the first time on Sunday.  Since then, I've put trim on the bodice and made a frill for inside the collar (post coming soon).

Elsa slept through the battle on Sunday!


More pictures from this event on Facebook

 Upcoming post topics will be an updated sewing list, another event post, details of new semi-sheer, new chemise, and whatever else I can think up and remember!

Saturday, June 4, 2011

First Event of the 2011 Season

Cannon-fire on Saturday
 Well, we have officially kicked off the 2011 season! We had our first event last weekend.  6 years ago it was my very first event.  I bought my first dress there--pretty farby, but not bad for a beginning (at least it was a one piece dress!). Unfortunately, this past weekend marked it as the last event at this location :( Sad.  It was originally run by an individual person and then it got to be too much and he gave it up.  The chamber of commerce then picked it up with a grant for three years and this was the last of the three years.  So hopefully someone in the area will start a new event somewhere else.  It was only 30 minutes from our house, so that was really nice! :-/ Oh well! It is what it is!


Elsa loved our friend's dulcimer! She just loves any kind of music!

The weather was pretty darn good! Especially, considering how wet this Spring has been! It only rained a little bit on Saturday and Saturday night.  It was pretty hot on Sunday, but as long as you stayed in the shade it was fine! Saturday I wore my red plaid dress and Sunday I wore my sheer dress. 

My mom and E (Mom's hair got whipped around by the wind, hence the bangs ;))


 One of the most exciting parts of the weekend was getting to wear my new Timely Tresses bonnet that Tim got me for Christmas!! I've had it since March so I've been burning to wear it since then! I am SO thrilled with it! It makes me want to attempt making one....maybe someday :)

The 26th TX is now a dismounted AND mounted cavalry unit! :) This was "Buck's" first event and he did GREAT!


Better picture of Tim's new shirt :)


Our Wonderful Little Family <3 God is so good to me!

Wednesday, May 18, 2011

Spring 2011 Sewing List - Update #2

Here's my currently updated Spring 2011 Sewing To-Do list (original list posted on 3/29) with newest updates in creamy burnt orange (red is from Update #1):

Mend N's hat Finished 3/26
Pocket in wool dress skirt
Finished 3/26
Corset - I've got the "first draft" (mockup stage) almost ready to go.
Finish Toile - I really can't finish this until I do the corset...
Wool bodice - I really can't do this until I finish the toile! (This fabric)
Semi-sheer dress - See "wool bodice" ^^.  I ripped the skirt panels today (5/18).  This fabric
Fancy petticoat - Because let's face it, I just need a fancy petticoat to go under my sheer dress and my wrapper! My inspiration image.
Re-pleat Green cotton print dress skirt - Fortunately, this is the only dress that needs re-pleating after I made my cage!
Shirt for Tim -  Finished 5/11
Cage - Finished 4/11
Kid's clothes:
Underclothes - I originally thought it'd be okay, but I actually ended up having to take one of the petticoats up because Miss E is a tiny thing :) 
E's Dress - Finished 5/11 
Short sleeves in N's tunics

Monday, May 16, 2011

Pink Yoked Dress


I finished DD's dress a few days ago and finally got around to dressing her up and taking pictures--taking pictures of a fully mobile 10 month old is a feat in and of itself. :P

Yep.  She's a ham.

I got the fabric from Joann's for 3.99 a yard.  It's a really nice quality cotton.  I used Liz's infant dress pattern (and yes I did a mock-up--or rather three.  Miss-E doesn't seem to be average, but of course, I knew that already :D).  I have always wanted to do a yoked style, and this was the perfect chance! The sleeves are the loose style sleeves.  It closes with hooks and eyes in the back.  It's sewn 100% by hand (I seem to be doing things by hand more and more :)). 

I am SO very pleased with how it came out!

Wednesday, May 11, 2011

Tim's Shirt and a Sneak-Peek


I finished Tim's shirt a while back, but I had to wash it after all the handling, grubby children fingers, and muddy dogs rubbing up against it while I was sewing. :P (good thing they're cute). The pattern (Laughing Moon #107) worked up really nicely! The directions and illustrations were very clear and the pieces all fit together really well.

I made the changes that are suggested in this SA thread to make the shirt more appropriate than a square-cut shirt for 1860s. These changes include:

  • Squaring off the bottom (rather than the round shape the pattern has)
  • Omitting the sleeve placket piece and slit and simply hemming the edges of the slit in the seam
  • Gathering the yoke all the way across instead of in two distinct spots
  • Moving the cuff buttonholes up near the sleeve/cuff seam, per Mrs. Schmitt's suggestion
I would change a few things next time around.
  • Center the buttonholes in the front placket rather than keep it 1/2" from the fold.
  • Be more careful when putting in the collar (I somehow got it flipped upside down so the interfaced side is on the bottom...>-/)
  • Make the collar smaller for DH's small neck ;)
All in all, those are very minor things and I'm very pleased with how it came out! The fabric was REALLY nice to work with!


More Sewing Academy reading on Men's shirts:
My questions about this pattern and what collar views to use, etc.
Men's Dress Shirt
Style's of Men's Shirts
Adventure in Man's Shirt


And just a little sneak-peek into my current project, Elsa's Dress:

Tuesday, April 12, 2011

Spring 2011 Sewing List - Update #1

Here's my updated Spring 2011 Sewing To-Do list (original list posted on 3/29) with new updates in red:

Mend N's hat Finished 3/26
Pocket in wool dress skirt
Finished 3/26
Corset - I think I've decided to have my sister do Liz's duct tape pattern draft method.
Finish Toile - I really can't finish this until I do the corset...
Wool bodice - I really can't do this until I finish the toile! (This fabric)
Sheer dress - See "wool bodice" ^^. Though, I COULD do the skirt. (This fabric)
Fancy petticoat - Because let's face it, I just need a fancy petticoat to go under my sheer dress and my wrapper! My inspiration image.
Shirt for Tim - He's requested a white shirt. Have pattern, now also have fabric.
Cage - Finished 4/11
E's clothes:
Underclothes? - I think she'll be set with N's old ones Yes. They'll be good.
Dress - I found a double pink at Joann's!!! For $3.99 a yard! YAY! :) So now I have to design it. I think I'm going to do a yoked bodice with bishop sleeves for the long and loose sleeves for the short!
Trim N's old red plaid dress - Maybe ruching? Decided to not do this.

Saturday, April 9, 2011

Cage - Finished!

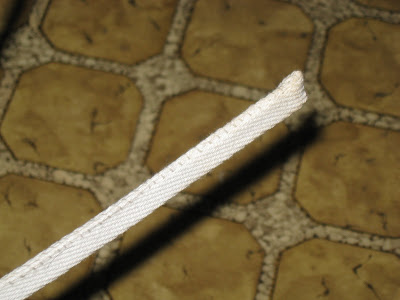
I started my cage project a couple of days ago. I decided that the best and cheapest way for me to get a cage was disassemble my old 120"+ (read TOO BIG) 6 bone bridal hoop and use the plastic covered steels out of it. Of course, I wasn't going to have the plastic covered steel showing, so I bought a 72 yard of heavyweight cotton twill tape. I then hand-whipped the twill tape over the hooping.

I used Elizabeth Stewart-Clark's The Dressmaker's Guide as a guide, but I also used acquired knowledge from Sewing Academy posts from other forum member's who have made their own cages. The major things I changed from Liz's directions was to add a center back tape and to secure the steels in the tapes rather than let them "float" in the tapes. I also had to space the steels closer together than she suggests because I'm only 5'2" and I was using 6 steels instead of her suggested 4-5. Another thing I changed was not to use boning connectors, I just overlapped the steels and sewed through the tapes covering them. I spaced the bottom rungs 3" apart (7/8" channels) and the rest 5". The bottom two rungs are about the same circumference--100", the rest decrease in a very scientific and mathematically "lean" method: "as was pleasing to the eye". :P SOOO, without further ado, pictures!

Cage - In Progress

These pictures were taken yesterday morning. I've still got some steels to secure in the tapes and then finish balancing it on a waistband.


More when I'm finished. :)

Tuesday, March 29, 2011

Spring 2011 Sewing List

Well, I sat down and compiled my Spring 2011 Sewing To-Do list today so I thought I'd share that here. Here is what I came up with:

Mend N's hat
Pocket in wool dress skirt

Corset - I really need to do something with The Corset. I know I've been wearing it too high, so it might just be that, but I suspect that it's too long in the first place. I'm trying to decide whether to just make a new one (having my sister do Liz's duct tape pattern draft method) or just keep fiddling with this one.
Finish Toile - I really can't finish this until I figure out what to do about the corset...
Wool bodice - I really can't do this until I finish the toile! (This fabric)
Sheer dress - See "wool bodice" ^^. Though, I COULD do the skirt. But I haven't even gotten the fabric yet (I bought it, just not arrived).
Fancy petticoat - Because let's face it, I just need a fancy petticoat to go under my sheer dress (soon to be "dresses", plural) and my wrapper! My inspiration image.
Shirt for Tim - He's requested a white shirt. Have pattern, need fabric.
Cage - I took apart my old 6 bone hoop (Read: GWTW huge). I'm going to cover the plastic covered steel boning in twill tape and then make a cage per Liz's instructions.
E's clothes:
Underclothes? - I think she'll be set with N's old ones
Dress - I am just DYING to make her a double pink/cinnamon pink dress for her....we shall see. I haven't found any for less than $8 a yard.
Trim N's old red plaid dress - Maybe ruching?

Monday, February 28, 2011

Collars 101


A fresh white collar is one of the fastest ways to spruce up your impression. In my opinion, not wearing a collar for a "better" impression should be done with thought and education. It is common (and a nice touch) to wear a neckerchief for working impressions, but not nice enough for a better impression. 1860s collars are almost exclusively white (not off-white, cream or ecru)--the main exception being black for mourning. Collars are not merely decorative (though nothing sets off a nice ensemble like a crisp white collar) but are highly functional. The purpose being that you detach the collar to wash it instead of washing your whole dress. Period laundry practices are harsh and lengthy. It is just much easier and cheaper to wash a small piece of cotton or linen rather than a whole dress--especially if that dress is silk or wool. Collars should be easily detachable, NOT permanently sewn to the dress. When I sew my collars on, I use about 1" basting stitches. It takes about 5 minutes and it's just one of the things you have to do before an event.

Most collars that you see at a reenactment are more bulky than they should be. They should be somewhat fine accessories (really fine for upper class impressions). Lawn, organdy, batiste and other fine cottons (or even linens) are excellent choices. If you only have muslin on hand and can't make it to the store, a one layer (bleached) muslin collar will work in a pinch. Just use Elizabeth Clark's narrow-rolled hem directions and you'll have a lovely collar that you can wear in good health. Double layer collars are way over-represented at reenactments, so I like to use single layer construction for my collars.

What do you like to use for collars? Single or double-layer? Do you even wear a collar? If not, why not? Do you wear anything at your neck?

Further reading (Sewing Academy threads):
"What Options Do I Have For Collars?"
"Collar Tricks"


Monday, February 21, 2011

First Post

Well, I've decided to have a separate blog for reenacting topics so my fellow reenactors don't have to weed through my natural living posts if they don't want to read that sort of thing. If you do want to, please follow my Her Heart At Home blog. I'll be coming up with some posts shortly :)

Wednesday, January 12, 2011

2011 Anti-Winter Dreariness Sewing List

Since we have entered the post-Christmas/New Year winter dreariness, I thought I should have some 'Anti-Winter Dreariness' sewing projects so after I finish some modern sewing, I will attack this.
  • Finish toile - this will require some help (oh Mumsy....?)as the shoulder is bunching pretty badly and I need someone to smooth it up.
  • Put pocket in side seam and hooks or button on wool skirt
  • Wool bodice - can't finish or even start this until I have my toile done
  • Velvet belt
  • More Collars
  • Remake collar that's shown in picture above -- I forgot to chop the seam allowance off of it.
  • Fancy over-hoop petticoat based on this petti from the MET. (click for bigger picture)
Mom, Em, and Stasia need:
  • Corded bonnet for each of them
  • Corded stays for Em
  • Wool dress for Mom
  • Re-fit Mom's work dress
  • De-farb Mom's straw bonnet
  • 2 drawers for Mom
  • 2 chemises for Mom
  • Petticoats for Mom
  • Probably drawers and chemise(s) for Em